Possible fix for Nexus 7 screen lift

Since getting my Nexus 7, I’ve been using it daily for just about everything. I’ve gotten to the point where I stopped opening my laptop after getting home from work. It really is that useful of a device at this point.
Although the size and performance is great, there are some glaring quality control issues that Asus has let slip thru their factories. Aside from the very prominent speaker crackling issue that plagues both the 8GB and 16GB models, there’s also the dreaded screen lifting problem. This lifting problem is pretty much what it sounds like — the screen is lifted slightly above the bezel. This usually occurs on the left side of the screen, so the glass will be just that slightly higher than the other side.
There have been homebrew fixes all over the net, but the best I’ve seen is the removal of two screws. The reason I say it’s one of the best is because Asus may have adopted this as their fix. Small hardware spiel to follow.
To get the tablet together in one piece, many small screws are used to keep the PCB attached to the bezel. Due to the design of a tablet, the glass is always on the other side. So when the PCB is screwed down and the distances are not calculated correctly, it pushes onto the other side thus raising the glass. This is entirely not scientific and no testing has concluded this is the case, but that’s my best guess as to what’s happening.
So earlier, I said Asus may have adopted this as their “fix” as well. There are currently (as of this writing) three hardware versions of the Nexus 7. You have the C6O, C7O, and the C80 models. They are all pretty much identical, except for the fact that the C8O is missing two screws that are present in the previous two models. You can check the version you have from the SSN listed on the bar code sticker on your box. It’s also plastered on a sticker on the inside of the back cover. So let’s say you have the two older models and you want to remove the two screws, well, keep on reading.
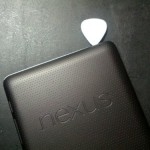
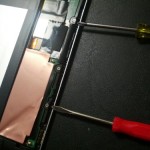
Power down your Nexus 7 first. Then using a guitar pick (or something similar), pry the back cover off your Nexus 7. Work very slowly and you’ll prevent any locking tabs from snapping off. Next, using a small precision screwdriver, remove the third and fifth screw on the right side. In the pic attached to this gallery, I have my screwdrivers pointing to the screws you need to focus on.
Once you are done removing the screws, snap the back cover back into place. And just like that, you have a C8O “version”. Hopefully this helps, the jury is still out on this one as to whether this will keep this issue fixed.

You must log in to post a comment.